Data Sources
Supported data sources are: CSV files, LoRaWAN sensors over “The Things Network” and influxDB connections.
Table of contents
csv Files
Generalities
- Time series data can get imported from CSV files
- The data should have the following structure:
time,value1,value2 2020-07-30 13:00:00,53,10.5 - The file can include one or multiple value columns
- Data can be separated by comma, semicolons or tabulators
- In case of a special file format, you can write an own
Parsing script. Details see csv scripts
Add new
- In the lcm application under
Settings > Data Sources > csv Files, click the buttonAdd new - Fill in the form as follows:
- SourceName
Name for the data source in the application. Can be defined freely - Parsing Script
Select a special parsing script if required. If you are unsure, selectnone - Choose CSV file
Navigate to the CSV file you want to import - Separator and Quote
Depends on the file - Time Zone Source Data
Select the time zone in which the data in the CSV file got monitored. If your time zone is not listed, please add it manually to the variabletimeZoneListin the file/app/shiny/global.RThe import procedure changes the time into the time zone of the application inSettings > App Configuration > Time Zone - Time Column
The recognized columns are listed. In case the column with the timestamp is not namedtime, the correct column can get selected as follows:
- SourceName
- At the bottom, you can see the data preview window
- Click
Add new data sourceif everything looks fine - Now the CSV file and its datapoints are selectable in
Settings > Data Points > Add newunderData Sourceresp.Data Point
the things network (ttn) applications
General
- The Things Network is a community based initiative to create a LoRaWAN network
- LoRaWAN devices are able to send messages over a distance of about 10 kilometres wirelessly to a network gateway, where the data gets forwarded via internet to a TTN server
- The link between the device and the TTN server is secured using an AES-128-End-to-End-Encryption
System architecture
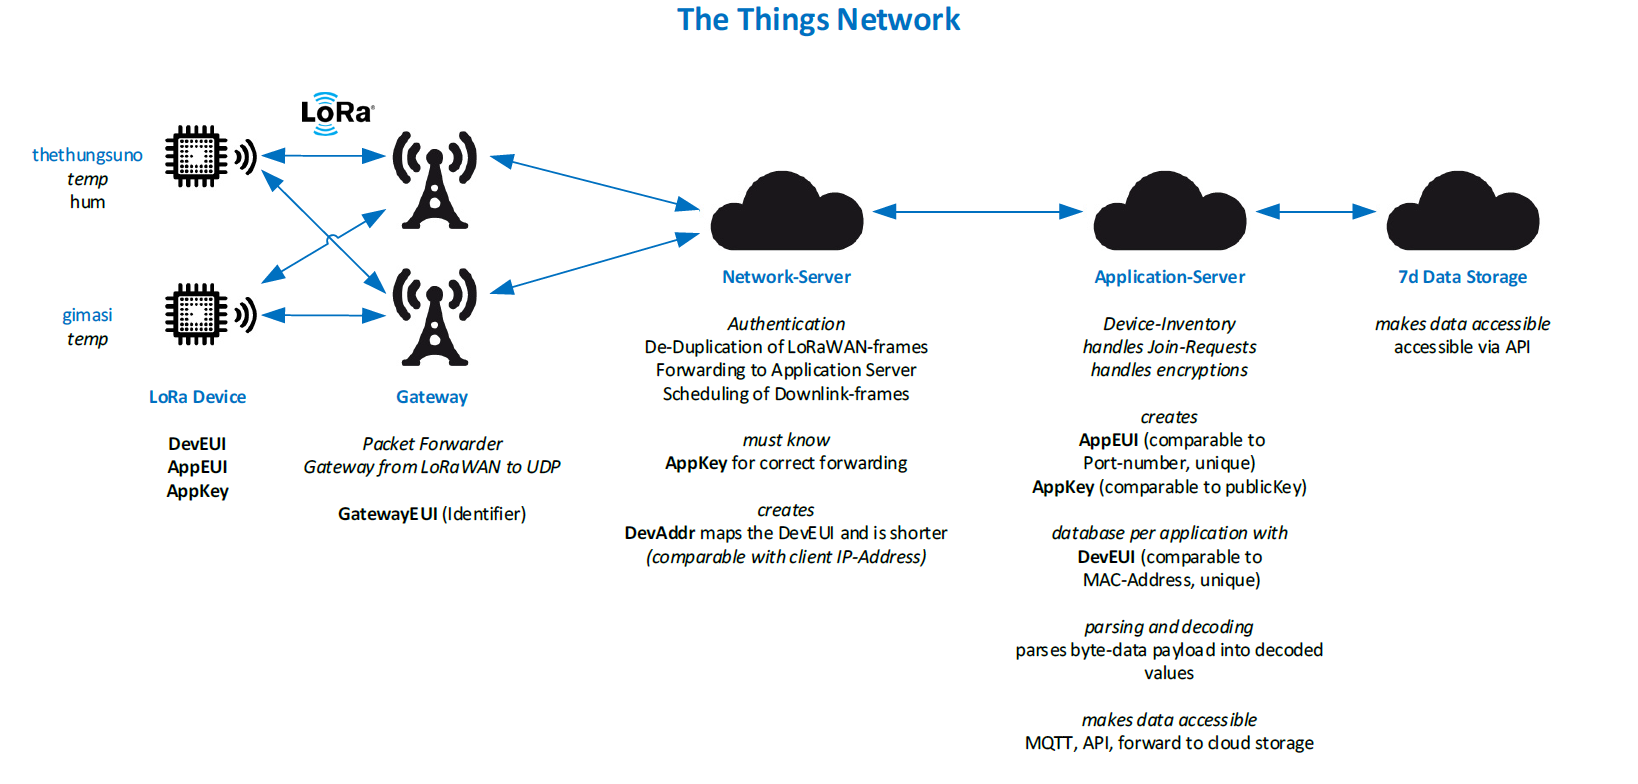
- LoRaWAN devices on the left send their sensor data to one or multiple antennas, so called LoRaWAN Gateways
- The gateway(s) forward the data to servers from the ttn community
- From there, the data normally get forwarded to the end application
- Normally the things network does not store time series data permanently in a data storage
- In the lcm application we use a cache offered by ttn, the 7-day data storage
- From there we can easily fetch the data when we want with the Data Fetcher
- The retrieved data gets stored in CSV files which you can find in the folder
/app/shiny/data/ttn/yourTtnAppName/yourTtnDeviceName_yourTtnDatapointName.csv - Hint: the measurements in the storage get saved with a UTC timestamp. The lcm application handels that automatically and changes the timezone depending on
Settings > App Configuration > Time Zone
Important prerequisite
- The data from LoRaWAN sensors are transmitted to a server of The Things Network. The data are then stored for a maximum of seven days. Consequently, the lcm application must retrieve and locally store the sensor data at least every seven days
- This is the purpose of the “Data Fetcher”. The Data Fetcher script collects all data from configured “the things network applications” and stores them locally as CSV files
- Here you can find information of how to set up the Data Fetcher
Add devices
- You can buy a LoRaWAN device and connect it to the network, free without charges or fees
- The separately available lora-devices-ttn documentation gives an overview of different LoRaWAN devices
- This documentation is kept separately because these steps are lcm independent
- Simply click there on a LoRaWAN device and you will get
- important documents
- ordering information
- step by step descriptions to integrate the sensor into the ttn network
- payload codes
- device configurations
- description how to setup the 7d data storage
Add ttn data to lcm
Once you have created an application with devices as described above, you can connect it now with your lcm application.
- Create a TTN application, add devices and configure them according to the separate lora-devices-ttn documentation. There you can find as well an overview of recommended devices
- Then click in the lcm application under
Settings > Data Sources > the things networkthe buttonAdd new - Fill the fields as follows:
- SourceName
Name for the application which you can define freely - Application ID
You can copy/paste this ID from your TTN application overview - Access Key
You can copy/paste this key from your TTN application overview (at the bottom of the page, starts withttn-account-v...) - Fetching Enabled
This setting defines whether the data get automatically imported by the lcm Data Fetcher. If you want to disable one application, you can deselect the checkbox
- SourceName
- Press
Test settings and preview data- now you should get an overview of the data in the TTN storage
- Finally press
Add new data source - Now the TTN application and its device datapoints are selectable in
Settings > Data Points > Add newunderData Sourceresp.Data Point
No TTN coverage at the buildings location
- Don’t panic, you can install and setup an own gateway within a few minutes. It’s easy and will cost you less than 100 Swiss Francs (September 2020) for the hardware
- an affordable indoor LoRaWAN Gateway from ttn
- and the corresponding installation description
- You only need to have a WLAN internet connection in the building and a 5V USB power supply
influxDB integration
Generalities
- An influxDB is a specialized database for time series
- Data can get injected from external systems and read easily from the lcm application
- An already existing ifnluxDB instance is prerequisite. Database installation and data injection is not described in detail here
- This integration is only implemented for users with influxDB knowledge
- The lcm application assumes that stored data of influxDB is in UTC time zone
- During import the lcm application changes the time zone to the configured one of
Settings > App Configuration > Time Zone - Currently, influxDB version 1.x is supported
Add new
- Click in the lcm application under
Settings > Data Sources > influxDBthe buttonAdd new - Fill the fields as follows:
- SourceName
Name for the data source in the application which you can define freely - InfluxDB Host Address
IP address of the influxDB instance - Port
influxDB’s port, per default 8086 - Username and Password
optional, depending on influxDB settings
- SourceName
- Click the button
Query databasesto get an overview of the configured databases in the influxDB instance - Select the desired database with the pull down menu
- Click the button
Test settings and preview datato get an overview of the available measurements of the selected database - Click
Add new data sourceif everything looks fine - Now the influx database and its measurements are selectable in
Settings > Data Points > Add newunderData Sourceresp.Data Point